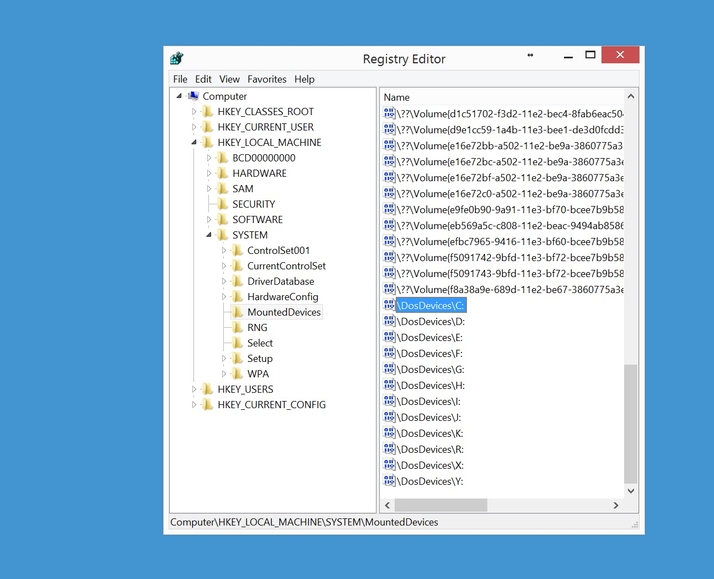
How to turn a new drive – hard drive or SSD – into your Windows PC– or laptop‘s C: drive. (See also: Recover deleted files for free: recover lost data.) QUESTION I recently purchased a new SSD to replace my old, failing drive. Eager to protect my files immediately, I removed the old drive and connected it to my laptop using a USB drive caddy, and then backed it up using Macrium Reflect. I then returned the drive to my original PC and plugged it in alongside my new SSD. The image file is intact and my files have been saved, but when I mounted the drive in the caddy it showed up on my laptop as drive E. This drive letter seems now to be ‘baked in’ to my image file and when I restore it to my new SSD it’s coming back as drive E with the original faulty drive as drive C. Windows 8 boots with the drives set up like this, but I realised that all references to drive C are still pointing to the old drive. If I remove the old drive, Windows won’t boot at all. I’ve gone into the Disk Management plug-in and attempted to swap over the drive letters, but Windows won’t let me do this as C and E are both currently in use. Is there any way I can turn my new drive into drive C now, so I can remove the old drive entirely? HELPROOM ANSWER Windows does its best to prevent you from messing up your computer by changing the drive letter of your system volume, but this doesn’t allow for a situation like yours where it’s already messed up and you need to put it right. Thankfully, you can dig yourself out of this situation with a little bit of Registry tweaking. Be warned: don’t attempt this unless you’re in a situation where your drive letters are wrong to start with. You can really mess things up and render your PC non-bootable. Because this procedure involves changing system-level configuration, you will need to have Administrator level access to your PC. So, assuming you have everything important backed up before you start, press Win-R to bring up the Run dialog box and type: Regedt32.exe (note the missing i in ‘edt’), to bring up the Registry Editor. Navigate to the key HKEY_LOCAL_MACHINESYSTEMMountedDevices. Right-click on MountedDevices and select ‘Permissions’ from the context menu. Click on Administrators in the upper pane and note the permissions set in the lower pane. If Full Control is ticked, leave everything as it is and exit Regedt32. Otherwise enable the Full Control permission and come back later to return it to its original setting once you’ve completed this whole procedure. Now exit Regedt32 and run Regedit.exe from the Run dialog box using the Win-R key combo. Navigate once again to HKEY_LOCAL_MACHINESYSTEMMountedDevices. In the right-hand pane look for an entry called DosDevicesC:. Right-click this entry and select ‘Rename’. Change the name to an unused drive letter such as DosDevicesU: (just pick any drive letter not already listed). Next, find the entry for the drive you want to become drive C. In your case, this would be DosDevicesE:. Rename this entry to DosDevicesC: Rename DosDevicesU: to DosDevicesE: to complete the swap. If you need to, go back to Regedt32 and reset the permissions changed in the first step above. Now restart the PC and you should find your drives now have the correct letter assignments.